"Ultimately, I discovered a constant truth in the standards of truth itself through the lessons taught me by history: the more things change, the more they stay the same."You should really read the whole thing.
Tuesday, October 5, 2010
Great Essay by David Leeson


Monday, October 4, 2010
Changes This Week
1. We are not going to have class on Thursday, Oct. 7.
2. We are not going on a field trip to see the lab - that will come later.
3. I'm considering changing the way I hand out your grades. Speak now or forever get your feedback through email.
2. We are not going on a field trip to see the lab - that will come later.
3. I'm considering changing the way I hand out your grades. Speak now or forever get your feedback through email.
Video About Peter Turnley
http://www.cpac.ca/forms/index.asp?dsp=template&act=view3&pagetype=vod&lang=e&clipID=4345
It is here.
It is here.
Sunday, October 3, 2010
Quick Video Shooting Tips
Ambient Sound
Your brain filters sound for you, but the microphone and camera operate differently. So, be sure to wear headphones when you are recording, if possible. That is the only way you can really know what is happening with your audio.
What if you can’t listen to your sound directly while recording? Some cameras don’t have this as an option. Consider adding that ability with a BeachTek box, if possible. As a last resort, record about a minute in the location where you will be recording, and play it back for yourself. Hopefully, you will be able to hear and identify problems.
Potential audio problem sources include, but aren’t limited to things like traffic, air traffic, air conditioners, fans, and freezers.
One audio problem source is easy to fix - you. If you’re used to talking a lot during an interview, train yourself out of it. After your first recording, you might be surprised to hear how often you interrupt people. Also, simply saying “yes” or “uh-huh” feels completely natural to most people, but can create real problems in the edit room. If you find that you are cutting people off a lot, practice mentally counting to five before you ask your next question. Smile a lot and nod so that the person knows you are listening. You may have to explain that you have to be quiet, because you will be edited out later.
Verticals and Tilted Frames
Video editing software can’t straighten or turn video the same way that photo editing software can for photos. So, please don’t turn a video camera to shoot a vertical in the same way you would for a still photo. The lack of ability to fix a tilt brings us to our next subject.
Tripod
They can be awkward, but they really do offer you a peace of mind you can’t get anywhere else. Make sure the tripod is not crooked and that the camera is firmly attached.
Never leave a camera attached to a tripod. The second you walk away, there’s a good chance the camera will be knocked over.
In some situations, you can’t avoid using your camera without a tripod. In those cases, shoot what you have to without a tripod and then use a tripod to take some stable shots of the situation. In the edit room, you can use the audio you shot with the shaky camera with some stable shots you took with the tripod. It just gives you a chance to improve the quality of shooting in those spot-news or fast-moving situations.
B-Roll
B-roll is used to add context and interest to a situation.
If you think you will need 5 shots, try for 10. That way you will have more options later.
Hold each shot for at least 10 seconds. There’s often a shakiness at the beginning and end of a clip, so you need to leave yourself room to edit around that.
Your brain filters sound for you, but the microphone and camera operate differently. So, be sure to wear headphones when you are recording, if possible. That is the only way you can really know what is happening with your audio.
What if you can’t listen to your sound directly while recording? Some cameras don’t have this as an option. Consider adding that ability with a BeachTek box, if possible. As a last resort, record about a minute in the location where you will be recording, and play it back for yourself. Hopefully, you will be able to hear and identify problems.
Potential audio problem sources include, but aren’t limited to things like traffic, air traffic, air conditioners, fans, and freezers.
One audio problem source is easy to fix - you. If you’re used to talking a lot during an interview, train yourself out of it. After your first recording, you might be surprised to hear how often you interrupt people. Also, simply saying “yes” or “uh-huh” feels completely natural to most people, but can create real problems in the edit room. If you find that you are cutting people off a lot, practice mentally counting to five before you ask your next question. Smile a lot and nod so that the person knows you are listening. You may have to explain that you have to be quiet, because you will be edited out later.
Verticals and Tilted Frames
Video editing software can’t straighten or turn video the same way that photo editing software can for photos. So, please don’t turn a video camera to shoot a vertical in the same way you would for a still photo. The lack of ability to fix a tilt brings us to our next subject.
Tripod
They can be awkward, but they really do offer you a peace of mind you can’t get anywhere else. Make sure the tripod is not crooked and that the camera is firmly attached.
Never leave a camera attached to a tripod. The second you walk away, there’s a good chance the camera will be knocked over.
In some situations, you can’t avoid using your camera without a tripod. In those cases, shoot what you have to without a tripod and then use a tripod to take some stable shots of the situation. In the edit room, you can use the audio you shot with the shaky camera with some stable shots you took with the tripod. It just gives you a chance to improve the quality of shooting in those spot-news or fast-moving situations.
B-Roll
B-roll is used to add context and interest to a situation.
If you think you will need 5 shots, try for 10. That way you will have more options later.
Hold each shot for at least 10 seconds. There’s often a shakiness at the beginning and end of a clip, so you need to leave yourself room to edit around that.
Photoshop Shortcuts
History Brush Tool, Part 2 of 2
You can also apply the History Brush tool to lighten (or dodge) a small part of an image.
The other main way you can use the History Brush tool by applying a change over the entire image, then removing that change from a small part of it.
Let’s say I start with this image.
I want the whole thing to be darker, so I make it darker using Curves.
But I want the “light” to be nice and bright on the girl, so I point the History Brush tool to be set to before the change.
Now I use the brush to paint an area where I’m basically undoing the change I did before with Curves. The brush settings are the same as before, at 30% and a fairly large size.
The final image looks like this:

The other main way you can use the History Brush tool by applying a change over the entire image, then removing that change from a small part of it.
Let’s say I start with this image.
I want the whole thing to be darker, so I make it darker using Curves.
But I want the “light” to be nice and bright on the girl, so I point the History Brush tool to be set to before the change.
Now I use the brush to paint an area where I’m basically undoing the change I did before with Curves. The brush settings are the same as before, at 30% and a fairly large size.
The final image looks like this:
Using the History Brush Tool to Dodge and Burn in PhotoShop, Part 1 of 2
I’m using Adobe Photoshop CS 5 on a Macintosh computer, but the history brush has been around for at least the last eight versions of the software, so it should work in the same way for pretty much any Photoshop currently available.
Darkening one area of a photograph is known as “burning”. Let’s start with this image from a beach in Oregon.
It’s a pretty good photo, but the lighter area on the left-hand side is a little distracting.
In Photoshop, go to Image > Adjustments > Curves and pull down the entire image so that it’s a bit darker.

We don’t want the entire image to be that dark, just the small section on the left-hand side, so we’re going to go to the history palette, undo the change, and set up the history brush. You can find it under Window > History.
Undo the Curves change by clicking on “Open”, and then click the little gray box on the left to set up the history brush.

Now, go over to your tools palette and choose the history brush.

You can change the size and everything about the brush just like any other. For this example, I’m going to use a brush 300 pixels wide set at 30% opacity.

Now, every time you click on the image, you will move that particular section of the image 30% closer to the change you made with your curves. You can then make the change subtle or harsh, depending on how much you click. If you don’t like your affect, you can always undo it.
Here’s the final image:
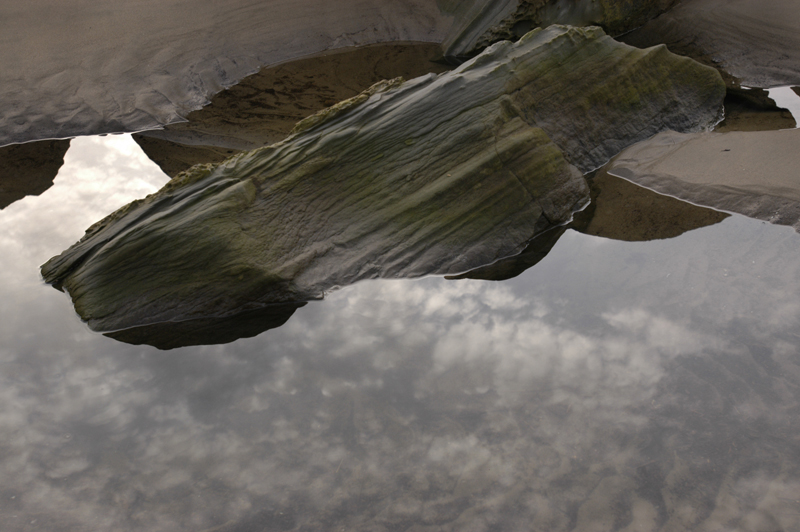
It’s not a very dramatic change, but that’s the point. You just have a little more detail than you had before, and you could always make the change more obvious by making the original Curves change more dramatic when you begin.
Darkening one area of a photograph is known as “burning”. Let’s start with this image from a beach in Oregon.
It’s a pretty good photo, but the lighter area on the left-hand side is a little distracting.
In Photoshop, go to Image > Adjustments > Curves and pull down the entire image so that it’s a bit darker.
We don’t want the entire image to be that dark, just the small section on the left-hand side, so we’re going to go to the history palette, undo the change, and set up the history brush. You can find it under Window > History.
Undo the Curves change by clicking on “Open”, and then click the little gray box on the left to set up the history brush.
Now, go over to your tools palette and choose the history brush.
You can change the size and everything about the brush just like any other. For this example, I’m going to use a brush 300 pixels wide set at 30% opacity.
Now, every time you click on the image, you will move that particular section of the image 30% closer to the change you made with your curves. You can then make the change subtle or harsh, depending on how much you click. If you don’t like your affect, you can always undo it.
Here’s the final image:
It’s not a very dramatic change, but that’s the point. You just have a little more detail than you had before, and you could always make the change more obvious by making the original Curves change more dramatic when you begin.
Subscribe to:
Posts (Atom)